Fun with EL Wire
Electroluminescent wire is flexible, inexpensive, and available in several colors.
You can see it in custom cars, artwork, and similar applications.
A good source for the wire itself is www.Coolight.com. For indoor use, the thinner gauge product is fine. The natural color of the phosphor is blue-green – other colors are obtained by different phosphors or colored jackets. Blue-green is the brightest color, so use it where possible.
Buy 20 - 30 feet of wire in one or more colors.
You will also need an exciter module to turn low DC voltage into 70V excitation voltage, and soldering/wire termination materials to prepare your own ELwire segments in the lengths you require. Coolight also sells sequencers and combination exciter/sequencers
If you want a programmable sequencer, www.Sparkfun.com makes both an Arduino shield and a stand-alone Arduino-software-compatible ELwire sequencer. Each of these has 8 computer-controlled triacs to control current to the lengths of wire. You can program the Arduino to switch or fade wire segments in a pattern or in response to external inputs like an infrared proximity sensor or ultrasonic distance sensor. Sparkfun also sells Lithium-Polymer flat battery packs with small JST connectors, LiPoly chargers, JST connector pigtail assemblies, and heatshrink tubing.
http://www.sparkfun.com/commerce/product_info.php?products_id=9203
http://www.sparkfun.com/commerce/product_info.php?products_id=9914
http://www.sparkfun.com/commerce/product_info.php?products_id=9353
http://www.sparkfun.com/commerce/product_info.php?products_id=726
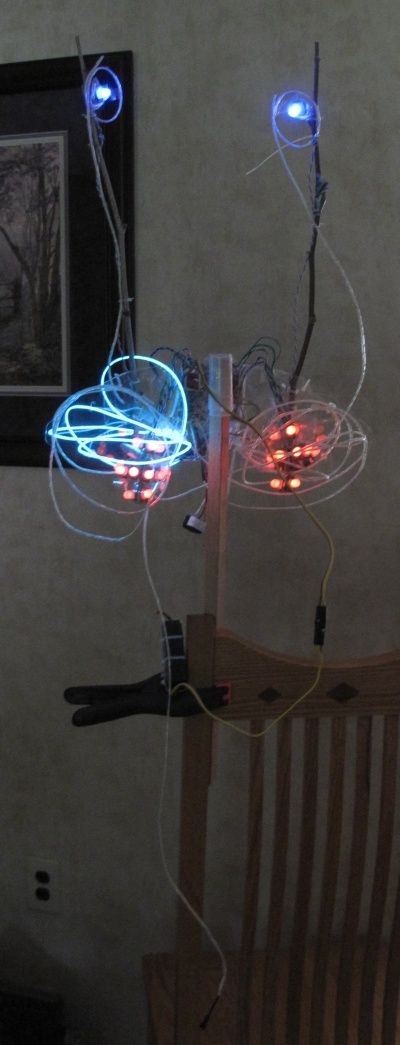
Building a FSM simulacrum
Pastafarians everywhere will appreciate this iconic project.
Movie of FSM in action. Best viewed with VLC, set rotate to 270 degrees
![]() Click for 10 Mb MOV of the flying spaghetti monster
Click for 10 Mb MOV of the flying spaghetti monster
- - - - - - - - - - - - - - - - - - - - - - - - - - - - - - - - -
You will need:
(For the Pasta)
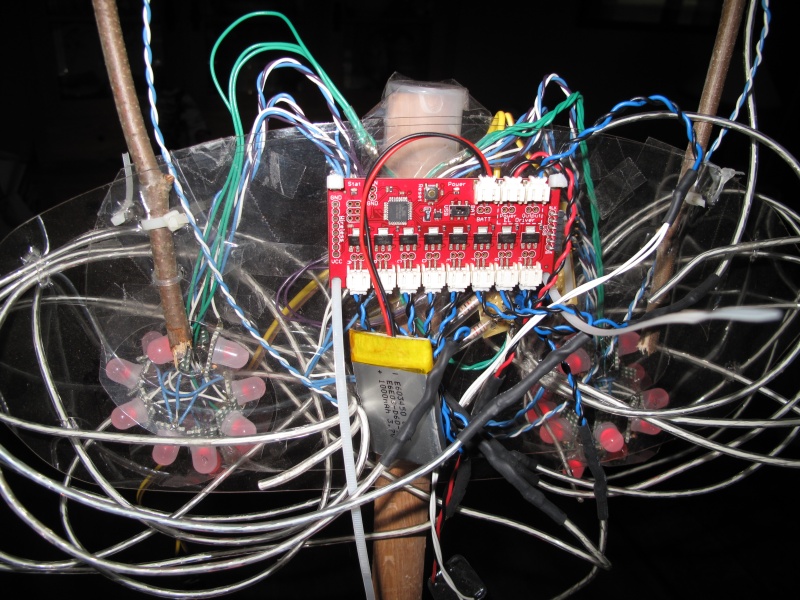
Sparkfun standalone ELwire sequencer board.
1 Amp-Hour 3.7V Lithium-polymer battery and charger (for sequencer.)
8 terminated lengths of ELwire with JST connectors to match the board (small)
(For the meatballs)
30 Jumbo red LEDs (Evil Mad Science Laboratories)
30 100 ohm resistors
30 one-inch perfboard squares
3 555 timer chips
Various timing and bias resistors for 555s.
2 x 2 inch perfboard for 555 timers.
Small 6 to 12 volt C-cell battery pack or gel-cell battery and connectors.
(For the Eyes)
Two jumbo blue LEDs with perfboard and 100 ohm resistors.
(For the structure)
Transparent plastic 8 x 16 inches, 2 sheets cut to wide oval
Plastic pill bottle
Two 18” dowels or plastic rods to support eyes
Clear packing tape and/or ty-raps as needed.
(for the EL Wire segments)
To prepare a length of ELwire, you will need ¾ inch of adhesive copper foil, 3/4 inch of small heatshrink tubing and 1 1/2 inch of larger heatshrink tubing, plus 60/40 rosin-core solder and a JST-connector /lead assembly. Both large and small JST connectors are available, so be sure to use the size that fits your sequencer sockets. (Sparkfun uses mostly small JST)
ELWire Termination Steps:
1 - Cut to length then strip 1/2 inch of plastic insulation from one end of ELwire.
2 - Wrap copper foil around the plastic insulation next to the stripped end.
3 - Tease the delicate exciter wire(s) from the phosphor and wrap around the copper foil then solder.
4 - Strip the phosphor from the last ¼ inch of the solid wire using a knife or cutters.
5 - Cut ½ inch of the colored wire from your JST pigtail, leaving the black wire.
6 - Strip ¼ inch from each JST pigtail wire
7 - Cut ¾ inch of small tubing and thread it over the shortened pigtail wire. Push it at least one inch away from the end so it won’t shrink when you solder the joint.
8 - Solder the short wire to the phosphor-free solid wire then slide the heatshrink segment over it to protect it.
9 - Solder the black JST pigtail wire to the copper foil then slide a length of larger heatshrink tubing over the ELwire to cover both the copper foil and the phosphor leads.
10 - Shrink the tubing with a bic lighter or a heat gun.
Videos on terminating ELwire are available on YouTube, but some of them show sloppy work.
- - - - - - - - - - - - - - - - - - - - - - - - - - - - - - - - -
Assembly:
(Meatballs)
Design 555 circuit and LED bias resistors to match your battery
To make a swirling effect, make 3 circuits, A, B, C and drive one set of LEDs from each.
Build two ball-shapes with 3 LEDs, A, B, and C on bottom, 9 in middle belt, ABCABCABC, and another three on top.
Stiff solid wire and the perfboard holes can make the structure strong enough to survive without shorting.
For the technically-challenged, just wrap some red cellophane around a pair of (blinky) lamps and call it good.
Join 2 sheets of plastic, leaving open pocket at bottom
Tape the pill bottle inverted to top of one plastic sheet so a pole can lift the assembly.
Attach eye sticks from pill-bottle side so it will tilt forward.
Mount the 555 board inside the plastic sheets on one side with the ELwire sequencer and battery on the other side
Hang the balls from the two sides, partly-inside the open pocket.
Thread ELwire segments around the two balls, between them, up to the two eyes, and (of course) down for the noodley appendage.
- - - - - - - - - - - - - - - - - - - - - - - - - - - - - - - - -
Usage:
For a light parade - Hoist up on a broomstick and carry as a halberd
For a Haloween gimmick – suspend from monofilament line wrapped around pulleys
For a fixed display – replace batteries with AC power supplies
- - - - - - - - - - - - - - - - - - - - - - - - - - - - - - - - -
Upgrades – left as an exercise:
Let the noodly appendage be separately controlled
Let the meatball brightness or pulsing rate be controlled by a ground proximity sensor
Let one of the blue eyes blink after a touch of the noodley appendage
Let the above be controlled by XBEE or 315 mHz or RC radio remote control channel switches